Wednesday, November 25, 2009

Choices, And A Decision

Let me start by saying, holy cow...


... chartreuse has arrived! Finally I'm pleased and I think Mom will be, too. These fifteen yards are going to make a gorgeous rag-rug!

Also, I want to thank all of you for your amazing and innovative suggestions for completing my latest piece. I frequently use the phrase, "The Brain Trust" when describing to friends and family the community of quilters and artists I am fortunate enough to hang out with. This is not without good reason... no smoke being blown up your skirts, here. The breadth and depth of your quilting knowledge alone is extraordinary, but you each have a very deep bench because you've also got a passionate, intense artistry that is immensely inspiring. Thank you all for your willingness to share what you know and feel with the rest of us!

I went back and forth for days about how best to give this piece a proper finish. It has become, for now, My Latest Favorite, and I wanted very much to honor the spirit in which it was made, and my thought processes as I was constructing it. I did over-think it, in the end. But then it occurred to me: if I don't think about my art, sometimes even think about it a lot, who else will?

So the piece, which I came to think of as 'Squall' because of the stormy sunset color palette, is now finished and there's kind of a funny story to go with it. I am posting a hi-res version so if you click on it, you'll see more detail than this photo can offer.


'Squall' 30 x 22.5 2009
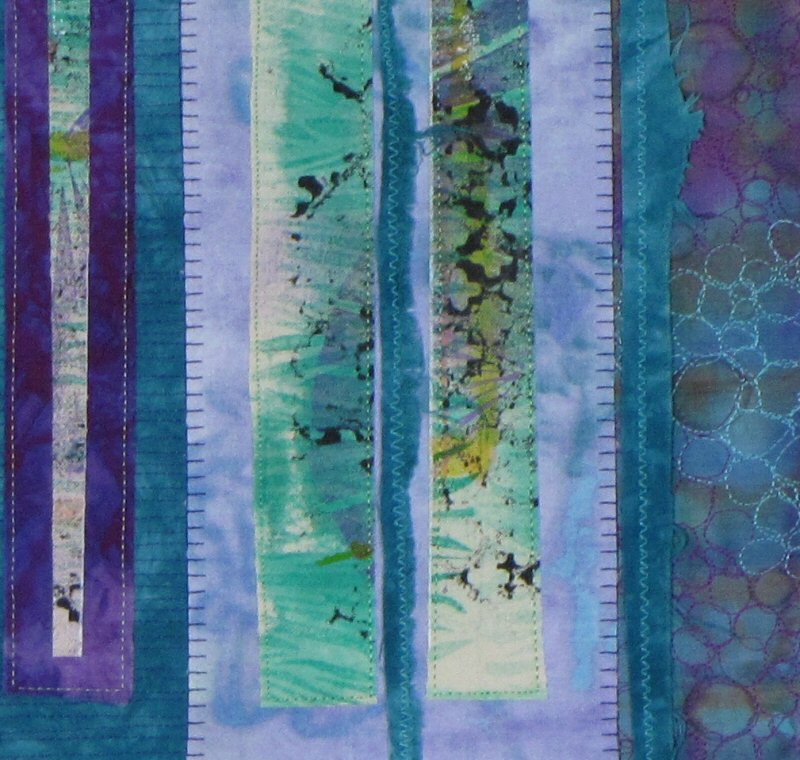


detail

After thinking through many different options, I finally settled on one of the simplest finishes and the one I knew I could do well... the pillowcase turn I had envisioned from the start. But how to allow the fraying and stitch work, the heart of what I wanted to express, to remain exposed? The solution was ridiculously easy: take a page from my experimentation with my pleat and snip work and construct the pillowcase top as a separate unit- then simply stitch the two pieces together.

I had a beautiful hand-dyed teal green fabric just begging to become the backing for this piece but because I'm not known for my measuring abilities (stop laughing, I'm a total left-brainer), I decided to make a template to use to cut my fabrics and define my stitch lines. I could sandwich my "pillowtop" the usual way (fabric, batting, fabric), trace the template onto it, sew, trim, turn, poof- instant backing!

While searching for something large enough to cut my template from, I came across a sheet of fabric paper I'd made a few years ago back when that was the craze. Honestly, I'd never had a lot of luck with laminating fabric to paper, though I gave it many tries. Finally, in a last ditch effort to make it work, I tried laminating dyed cheesecloth to painted paper. The cheesecloth adhered beautifully, but I wasn't crazy about the final piece, so I stuck it away in my paper storage unit and forgot about it.

I dragged it out yesterday and realized that not only did it have a appropriate textile texture, but the colors were an almost exact match for my piece. I laid the completed stitchwork on top of it and knew they were a perfect fit, they had to be together. I didn't even alter the cheescloth paper, either- it was the perfect size, and was as close to square as I was ever going to get, so- abandoning the beautiful teal hand-dyed pillowtop idea- I stitched the quilttop to the cheesecloth paper and called it done.

Here is a detail shot of the texture of the cheesecloth paper.


The biggest concession I made for this piece was that it will have to be framed. I swore to myself that I'd stop making art that needs to be behind glass (how Approachable is that, I ask you?!) but I guess there will be work from time to time that requires me to compromise on that point.

Now that I've given birth to Squall, I think I'll take a few days off, guilt-free. Happy creating and Happy Thanksgiving!


Monday, November 23, 2009

Trailer Trashed!


A long-time online friend of mine from my favorite online hang-out, Radio Paradise, is the Director of Communications for the Recycling Committee of British Columbia and she's asking all you creative folks to help out and possibly win some cash in the process.

Here's what she has to say:

"Ever seen a movie trailer and thought…..WOW, that was so cool!!!

Or….wow, that was completely lame?
Well, here’s your chance to put on your producer/director/art director/cinematographer/sound engineer/actor and voice actor hats all at once and produce the most mind blowing enviro-trailer of all time!!
                                                    
The Recycling Council of B.C. is proud to announce:
   Trailer Trashed
An environmental short film competition that harnesses your creativity to convince the world to stop making garbage! But this is a film competition with a twist.

All the entries must be in the form of a movie trailer and they all have to convey this year’s waste reduction theme, which is:
Say NO to disposable coffee cups!
Each year in North America we cut down millions of trees to make  billions of paper coffee cups which are used for mere minutes and then thrown away, wasting our planet's valuable resources and creating totally unnecessary garbage.

Create a trailer that helps people make the choice to refuse to use disposable coffee cups!
You can use animation, live action, lego, toy soldiers, sock puppets, your family’s dog, your little brother or whomever else you can convince…and the trailer can take the style of any movie genre like horror, comedy, sci-fi, historical, action flick, love story, buddy movie, chick flick….well, you get the idea.

There are a few simple rules to follow (see www.trailertrashed.org). This contest is open to anyone and there is fame, glory, cash and other cool stuff to be won."


So if you're handy with a video camera and editing software, want to help the environment and win some cash, give her a shout. 

Sunday, November 22, 2009

Fray Me, Baby!

I've been obsessed all week with these fabrics, which I showed you in one of my last posts.


Something about the moody, almost bruised color palette stuck in my mind along with the weirdly opposing vibrancy of the hand-dyed fabrics, and just wouldn't let go. It asked to become an art piece.

Both the base fabric (in teal green) and mostly-purple piece (at the top of the photo) are hand dyed cotton fat quarters from my latest gradation.

The largest accent fabric was done on a lightweight, hand-dyed, pale green cotton that started its life as a bed sheet. I splattered and squirted multiple colors of alcohol inks onto it, let it dry and then ironed it nearly to death. To emphasize the somewhat circular pattern, I dripped clean isopropyl alcohol onto it from an eye dropper. If you've ever worked with alcohol inks on paper or other surfaces, you know that this will "push" the other pigments away and form variously sized dots with somewhat hard (visual) edges. Later, I would use these dots as guidelines for free-motion quilting a rock pattern.

I used two other accent fabrics. One is the back of a piece of painted and stamped duck cloth (the back turned out to be more interesting than the front), and the other, a piece of artist's canvas, was painted, stamped and dyed (really, I threw the kitchen sink at that one; I'm amazed it didn't just dissolve in protest).

I've developed an interesting little technique. When I work with paper, I know that I can tear it in many ways to achieve an almost endless variety of effects. Cotton fabric is, of course, stubbornly different in that way- you have a warp, you have a weft and you are obliged to work within that structure. If you tear the fabric, you can't achieve a "deckled" edge in the shape of your choosing; you get a straight edge with fraying.

I've found, however, that if I cut a piece of fabric- well, really the term I'm looking for here is hack- if I "hack" at a piece of fabric with either my straight-edged scissors or my pinking sheers and then launder the fabric as usual, I can control my beloved thread schmutz to a much greater degree and get a variety of organic shapes.


I used this technique to create several "distressed" strips of each of my fabrics, which will become focal points in the final piece.

When I do any kind of collage work, throughout the process, I snap photos of designs I particularly like. I tweak the design over hours or days (sometimes months, truthfully) and then before I begin final assembly, I take a few more photos- what I call "down-and-dirty shots". I don't care about color correction, angles or lighting for these shots, I just want a record of my final design decisions.


So enough about the individual components. Onto the construction!

My focus over the years in my painted work was always to bring the strict structure of hard, simple lines and geometric shapes together to work in harmony with more distressed, aged and chaotic themes. It seems only natural that my textile work now follows that same progression.

In this piece, I used the intentionally tattered remnants of my chosen fabrics to emphasize my desire to produce order from chaos. They lay in a tangle against tightly-stitched, meticulously pieced background work, reminding me that without a little wildness, structure quickly becomes stricture. I used a few raw-edged appliques, as well, and haven't fussed too much over them wanting to get in on the fraying action, too.

One more thing to tell you about before I show you the final piece (and then ask for an opinion). I am exploring new ways to finish a quilt top. I hate binding a quilt, and it reminds me too intimately of being boxed in, something I've fought against for a very long time. For this piece, I constructed the whole thing on a large piece of un-primed artists' canvas. I sort of had a vague idea when I started that I could, when all the decorative stitching was done, sew it to another piece of the canvas and then do a pillowcase turn on it. Maybe even paint the back with matching acrylic paints.

At first, the whole thing was very stiff and unyielding, but as the canvas stretched and was worked into, it began to soften, fray and generally loosen up. Before I was finished with my quilting of the piece, I was already considering not doing anything more to the piece to bind it. The layers of fabric combined with the heavy thread work has made the sides too inflexible to fold them back and get a nice flat final seam.

Now I am thinking about leaving the piece as it is, without any kind of binding. After all, what is finishing and trim for? To cover all the raw, messy edges. I've spent my life trying to cover my raw, messy edges and I've finally realized that it's the frayed parts of me, the parts worn down with hardships and laughter and years, that are my contrast and texture.

So I ask the quilting experts, and beginners- would you finish this piece or leave it raw with all of its work exposed?

This is the piece, sewn to its canvas backing material, with all its thread schmutz flying.


And this is essentially what it would look like if I cropped it down and trimmed it out.


Mom says I'm over-thinking all of it. What do you think?

Next week is Thanksgiving here in the states... have a wonderful holiday, those of you who celebrate! And as always, happy creating!

Tuesday, November 17, 2009

Progress On Some Fronts


Sassy Red Hibiscus Ignoring The Cold Weather

I really need to find better titles for my blog... maybe an automated title generator? Then I'd have titles like, "Gentry wallows from within goosenecks." You wouldn't know what the heck the post was going to be about, but it would be a real eye-catcher anyway, right?

This week has so far seen me make a few costly mistakes that I should have known better than to make, but that I know is part of the learning process.

When I started teaching myself to paint, many years ago, I learned about color theory mostly by making a lot of mistakes. One of my most consistent mistakes- the one I stubbornly perpetrated again and again- was trying to force some colors to work and play well together despite knowing full well that they would refuse. I would just get it into my head that I'd be able to mix purple and yellow, for instance, and get something really wonderful that wasn't mud-colored. I knew it was just a matter of time before the purple and yellow submitted to my will, so I kept mixing.  And I kept learning. And guess what? Purple and yellow can and do work and play well together- if you embrace their particular individual quirks. Oh, yeah, and if you learn how to mix them so that they form creamy, earthy love.

This past weekend and right up through yesterday, I've been making similarly stubborn mistakes and someone should take away my "Kiss Me, I'm A Quilter!" button because these mistakes aren't resulting just in some muddy brown painted papers that are easy to throw away or paint over, they are large-scale mistakes that are costing me real money.

Mom needs fifteen yards of chartreuse fabric, broken down into three values: three yards of light, six yards of medium and six yards of dark. Late last week, I cut three sections off a bolt of white muslin she and I had bought for this purpose, prepared the dye baths, batch-set the fabrics over night and stubbornly insisted to myself that the Bright Green I'd used would look exactly like the Chartreuse I'd promised her.

Guess what didn't happen?


I didn't get chartreuse, is what didn't happen. Who could have predicted that, raise your hands? So... fifteen yards in a lovely bright green colorway. I'll use it as my front lawn until the spring comes, I guess, so the yard will look green and growing even in the dead of February.

So, back to the cutting mat, hack off fifteen more yards, use honest-to-goodness Chartreuse dye this time (I'm stubborn- not stupid), and batch-set over night. I didn't have enough Chartreuse to do the whole job, I'll have to wait for more dye to arrive on Wednesday for that, but I was able to do three yards of light value and six yards of medium value.


Wait, don't tell me. You can't see a value difference in these three pieces either, can you? It's not the photograph, that's what they really look like. Despite using half as much dye per yard for the "light" value as for the medium, I got the exact same value. It has to do with the amount of fabric per liquid per dye powder and the actual application of math. Now, I'm a bright lady, but yeah, a picture says a thousand words- mainly that my math sucks.

I will buy some Anti-Chlor, dunk the lightest value in a bucket of bleach water until it reaches the proper value, and wash the whole mess out. Next time I agree to dye fifteen yards of fabric all at the same time, either give me the proper math well in advance, or smack me around a little until I wise up.

Other things got done this week, though, fun things.


The above little piece finally found a binding. Never mind that I had to trim off more of it than I had planned because, in an effort to try new things, I fused the binding on rather than using a traditional binding, and when I started stitching it, the machine ate one whole corner; the only way to repair it was to shave a quarter-inch off that entire side.  Learning curves are harsh. Completing something feels gratifying, though.

On the books for future weeks, besides my commission installation, will be these fabrics in these combinations to create small art quilts upon which I can practice my free-motion quilting.


All of these fabrics started as plain white muslin that I cut straight off the bolt. It feels really good to know that my work is always 100% my own, from the stamped images I carve myself, to the hours spent dyeing, screen-printing and DSP fabrics.

Some of these bits were created yesterday using pre-dyed fabrics and, of all things, alcohol inks. This is not going to be a favorite technique of mine, however, because while the results are visually interesting, some of the ink colors seem to be totally impossible to set despite multiple ironings, while other colors set quite nicely. And of course, the hand of the fabric changes and gets a sort of crispy feeling to it, like it could crack if you crumpled it in your hands.

Still, experimentation is life.

Finally, this piece, which ended up being a joy to stitch, has most of its binding completed.


The really neat thing is that I got my Fall issue of the SAQA newsletter last night (I only recently signed up and they kindly sent me the most recent one) and read a wonderful article about NOT adding bindings to art quilts. I guess I've always feared that without a "proper" binding, my quilts might never be taken seriously by jurors and quilt show judges. I want so much to eventually create textiles that are not only visually and texturally exciting, but are of the utmost quality I can produce; I assumed that mastering traditional bindings was a necessary skill set I will need to move me towards that goal, but perhaps not (though I'd still like to learn how to make one efficently, in time).

However, after reading that article I feel freed from the task of binding every textile art piece I create, a job I never enjoyed doing and chafed at, creatively. I can perfect a pillowcase turn, a method I far prefer, and still feel that my quilts will one day reach the highest standards of excellence.

Onward and upward! Happy creating!

Monday, November 16, 2009

Compositional Conversation 13

You won't believe your eyes!! Artist Leslie Riley has added her astonishing and bold voice to our Conversation. Please go take a look (and comment, if you're inclined, and I'm betting you will be!).  We're in the home stretch, now... one more artist will add her perspective to the work and then the piece will be sent home to it's originator, Terry Jarrard-Dimond for finishing.

Sunday, November 15, 2009

Dye Candy Giveaway!


Chris, over at Dye Candy is hosting a fab giveaway of some of her gorgeous, hand-dyed fabrics. Run don't walk to the Dye Candy blog or its sister blog, Greetings From The Shady Grove!!

Wednesday, November 11, 2009

Compositional Conversation 12 (and a really great bag)

Kathy Loomis added her bold and distinctive voice to our Conversation. Go check it out at Terry's blog!

Also, while in Vegas we saw another Cirque du Soleil show at the Bellagio called "O" (last year we saw "Ka" and totally fell in love). It was eye-popping... a circus in water! While there, I grabbed a fab new purse in their shop.


front

 
back

Gorgeous, right?

The Desert Also Blooms

And I have proof!


We're back from Las Vegas, exhausted, broke and happy.

The gaming was fun (though not too profitable, despite two separate straight flushes in the last 24 hours before we left), the people were incredibly friendly and the meals? Holy cow... I think we ate our way through the city. It was true fine dining every night, starting with Circo, an impeccable Italian restaurant in the Bellagio Hotel, overlooking their fountains. We had tenderloin accompanied by risotto with white truffles (only available in November and December). Heavenly!

On another night, we ate at one of our favorite LV restaurants, Shibuya in the MGM Grand. This restaurant puts all other hibachi restaurants to shame and can even make Benihana, one of our favorite places to eat, seem stogy and unappetizing. Of course, it doesn't hurt that their Sake selection is huge. Here are our dinner companions...

First-time sake drinkers, before...


First-time sake drinkers, after. 

What a hoot they were. (Sorry for the blurry image- I'd had a little sake myself!)


Being at the MGM also allowed me to photograph the lions in their enclosure. 


Our last meal was truly special: a seven-course, chef's choice tasting menu at The Mix, which sits high atop THE Hotel. Scroll down the page and you'll find a link to the menu that says "Click to view prix fixe Menu (PDF file)". We tried the "Grand Tasting"... oh, my lord, was it amazing! The view from up there is a full 360 degrees of the Las Vegas cityscape. Spectacular.

It wasn't all hedonistic pleasures while we were there, however. We rented a car one day and escaped the city into the desert beyond. We saw the Hoover Dam...


...and took a tour of the huge turbines that generate power for six states (of particular interest to my engineer hubby).


You can still drive across the Dam for now, but by the end of next year, a newly-constructed overpass will redirect motorized traffic across the gorge. On one side of the Dam, you're in Nevada...


And on the other, Arizona...


We also drove the thirteen-mile loop through Lake Mead National Park. The lake is down about 150 feet due to a lengthy drought, but it was still quite stunning.


After the Dam and Lake Mead, we headed in the opposite direction, shot past Las Vegas to the west, and visited Red Rock Canyon, a truly rugged playground for hikers, sky-divers and nature lovers.

The sky was mostly overcast by that time, but when the sun would break through the clouds and shine on the mesas, it was breathtaking.


A few brave souls left the relative safety of the trails to rock climb.


This park is also home to ancient petroglyphs (images chipped into the stone cliff edifices) ...


...and pictographs (images painted onto the rock).


Being back in the real world feels a little odd, and we're still a bit jet-lagged (we lost two hours coming back), but both of us feel refreshed after this much-needed vacation.

This week I will be preparing fifteen yards of fabric in preparation for dyeing. Mom bought a small rag-rug loom at the International Quilt Festival and now needs chartreuse/lime green yardage to make her first rug.

Also, I will be (re-)starting work on my commission piece, so a resupply trip to the Dharma Trading site will be necessary. What a strain, eh?

And finally, I have completed the stitching on my most recent quilt and will be adding a binding, and I will also be finishing the binding of a smaller piece I completed a couple of weeks ago. Will post photos when they're available.

To see more (hi-res) photos of the desert and Red Rock Canyon, you can visit my photo blog, Approachable Photos. I should have a post up in another hour.

In the meantime, happy creating!

Tuesday, November 3, 2009

Winter Cometh (And I goeth to Vegas, baby!)


The hummers are departing for their long treks across the Gulf to South America, the air is chill enough that we've had the windows open around the clock for days, and every morning more fallen leaves fill the yard.

I've spent the last ten days or so working on an abstract quilt that incorporates some of my hand-dyed fabrics as well as some of my monoprinted and discharged pieces. My free-motion quilting needs a LOT of work, but doing pieces like this is great practice and I'm pleased that I haven't once wanted to throw my Sapphire through the window. Yet.


It is mostly machine pieced but uses a small bit of fusing (the "bamboo shoots" on the left were painted fabric fused down). I used, of all things, the hand-dyed cuff of an old blouse to bring a horizontal element to the piece.

I have no idea how I feel about it, yet. I'm trying to keep things simple- the quilts that have the most simple elements are often the ones that draw my eye first- but I'm keeping my mind open as I stitch to what it may have to tell me. I'm about half finished with the decorative stitching and then it will be bound. It measures about 30" by 20".

My commission piece stalled for a while: I lost inspiration for the design we'd decided on because it simply wasn't working. After a discussion with my client, she and I have hit on a solution that I believe will work far better and now I can't wait to dive in again.

Yesterday, I entered the Art(Raw) 09 online juried competition with these three pieces:


If a couple of these pieces look familiar to you, it's because I posted them a few months ago when I entered them into a juried show in Denver (and was turned down... ah, well).

Stage 11 of the Compositional Conversation is up and ready for you to ogle (and hopefully comment on because we'd love YOUR contribution to the Conversation, as well)! Valerie Goodwin was this week's artist and has added her unique voice to the mix. Please go take a look.

On Thursday, we're off to Las Vegas for a much-needed vacation. We'll be back on Monday night and will have an opportunity, while we're there, to have lunch with the very first friend I made. I met Betty Ann- who moved to Vegas about sixteen years ago- on the first day of first grade and we spent most of the next ten years together, inseparable and driving our poor mothers insane. I can't wait to see her!

So Until Monday, happy creating!