

(journal spread with transparent acrylic skins, white on the left and black on the top right)
A few months ago, I saw this brilliant video by Jane Davies, in which she demonstrated a technique for creating transparent acrylic skins. Go watch it, I'll wait.
Genius, right? But naturally, I had to change things up, modify a few steps, and generally make the technique work better for me in my studio. It's those tweaks that I'll be demo'ing in this blog post.
For those of you who are unable to watch the video, an acrylic skin is a thin film of acrylic paint that is created on a non-stick surface, allowed to dry fully, and then peeled off as one large piece and used in collage work. Before Jane's video (and to be fair, she told me that she learned the technique from another artist, Patty Brady), it had never occurred to me to make an acrylic skin with a transparent medium such as pouring medium, acrylic glazing liquid, clear tar gel, or fluid gloss medium ... mine had always been made just using opaque paints.
So, I'll explain what all of this means as we go along.
What You'll Need:
~ A soft-sided squeeze bottle with a narrow tip, one for each color of paint you want to use.
~ Acrylic paint. Craft paint works perfectly well for this, but use whatever you have on hand. Heavy-body paints will need some thinning and you can use any of the mediums I listed above to accomplish this.
~ Full-sheet plastic pocket protectors.
~ An X-Acto or craft knife and small cutting mat.
~ Any one (or a combination of) the clear fluid mediums listed above (pouring medium, acrylic glazing liquid, clear tar gel, or fluid gloss medium)
~ A little bit of time and a lot of patience.
What You'll Do:
~ First, open up your pocket protector. Protectors are already open at the top, so using your X-Acto on top of your cutting mat, make a slit down the leading (right side) edge and across the bottom of the protector. Leave the left side of the protector- the one with the holes that allow you to put it into a 3-ring binder- alone!

~ Fold open your pocket protector in front of you- you're going to be working on the right side of the inside of the protector.

~ Prepare your squeeze bottles by squeezing your paint colors into them.

~You won't need much, so don't go crazy filling the bottle unless you think you'll have a need for it in the future!

~ Now comes the fun part- mark-making! This is where you can totally personalize your acrylic skin. Ms. Davies uses simple and lovely scribbles, but me being me, I have to use Stacked Journaling, of course! However, you can do whatever you choose, from sketching with the paint to writing out your favorite passages, quotes, or words. Because the skin will be transparent, you'll be able to use either side of it, which means you won't have to worry about writing backwards in order for the writing to read properly on your finished work- just write as you normally would! Using the squeeze bottle filled with paint as if it was a pencil or other writing instrument, fill one side of the inside of the pocket protector with writing, scribbles, Stacked Journaling, or sketches. Be sure to leave the other side empty of paint.

~ Now is where your patience comes in. Let the paint dry! Because it's acrylic, it could dry very quickly, but if you used it fairly thickly, it will take longer. Twenty-four hours is usually sufficient.
~ Once the paint has dried, it's time to apply the fluid medium of your choice. In my example shown here, I used clear fluid gloss. It will go on cloudy, but dry perfectly transparent and glossy, with a lovely flexibility that will make it ideal for collaging. Mix the medium very carefully by holding it horizontally and rolling it slowly in your hand. Never shake a transparent fluid medium unless you have several hours available to let it sit and settle again, because shaking it will cause bubbles to form and they can be stubborn to pop!

~ Start your pour. This technique likes a lot of medium, so don't be skimpy with it. Squeeze out enough medium to cover all of the painted marks you made on your protector.

~ Most fluid mediums are self-leveling, but you may still get bare areas without any medium on them. You can use a palette knife, old credit card, or even the edge of a clean sheet of paper to fill them in by moving the wet medium around.

~ Your sheet protector should now look like this:

~ Now is a good time to look closely and see if you have any air bubbles. If you do and you leave them, they may level out as the medium dries, but it's more likely that they'll remain. Use a needle or needle tool to gently pop them.
~ Once again, your patience will be tried, because now you really need to wait until the medium dries. It usually only takes about 24 hours, but it may take longer depending on which medium you use, how thickly you squeezed it on, and how warm and humid your space is. Set it aside on a level surface, on piece of parchment paper or other non-stick sheet (in case any of the medium flows off the edge of the protector) and leave it alone! You will know when it's dried because it will have clarified completely (if there's any milkiness in its appearance, it isn't ready yet) and it will be smooth to the touch with no tacky areas. If you have difficulty picking it up to place it on parchment paper, you can slide your cutting mat or other flat, firm surface under the protector and transfer it to a piece of parchment for drying.
~ Once the medium is dried fully, you can use it at any time! Use a small piece, or the whole sheet, if you like. I like to cut small pieces or strips out of the whole sheet and use them in my collage work. I peel up just as much as I want to cut off...

... and then using regular scissors (don't use your fabric scissors for this!) I cut off a piece.

(Here, I cut a long strip off the end for use in a journal spread I'm working on.)

~ The beauty of creating these skins on the inside of the pocket protector is that when you've cut off the amount you want to use, you can close the protector over the remaining skin...

... and store the whole thing away in a 3-ring binder.

How cool is that? The skin won't dry out and become brittle over time because it's protected by being sandwiched in the protector and you can easily stash away any unused portions for later use!
How To Use:
~ Because the skin is made of artist's acrylics, it works beautifully with glues and gel mediums. To adhere a piece onto a collage, painting, or journal page, spread a thin layer of any kind of acrylic medium- even paint!- onto your substrate (here, I used matte medium)...

... press the skin onto the glue/medium and wipe away any excess medium with a baby wipe...
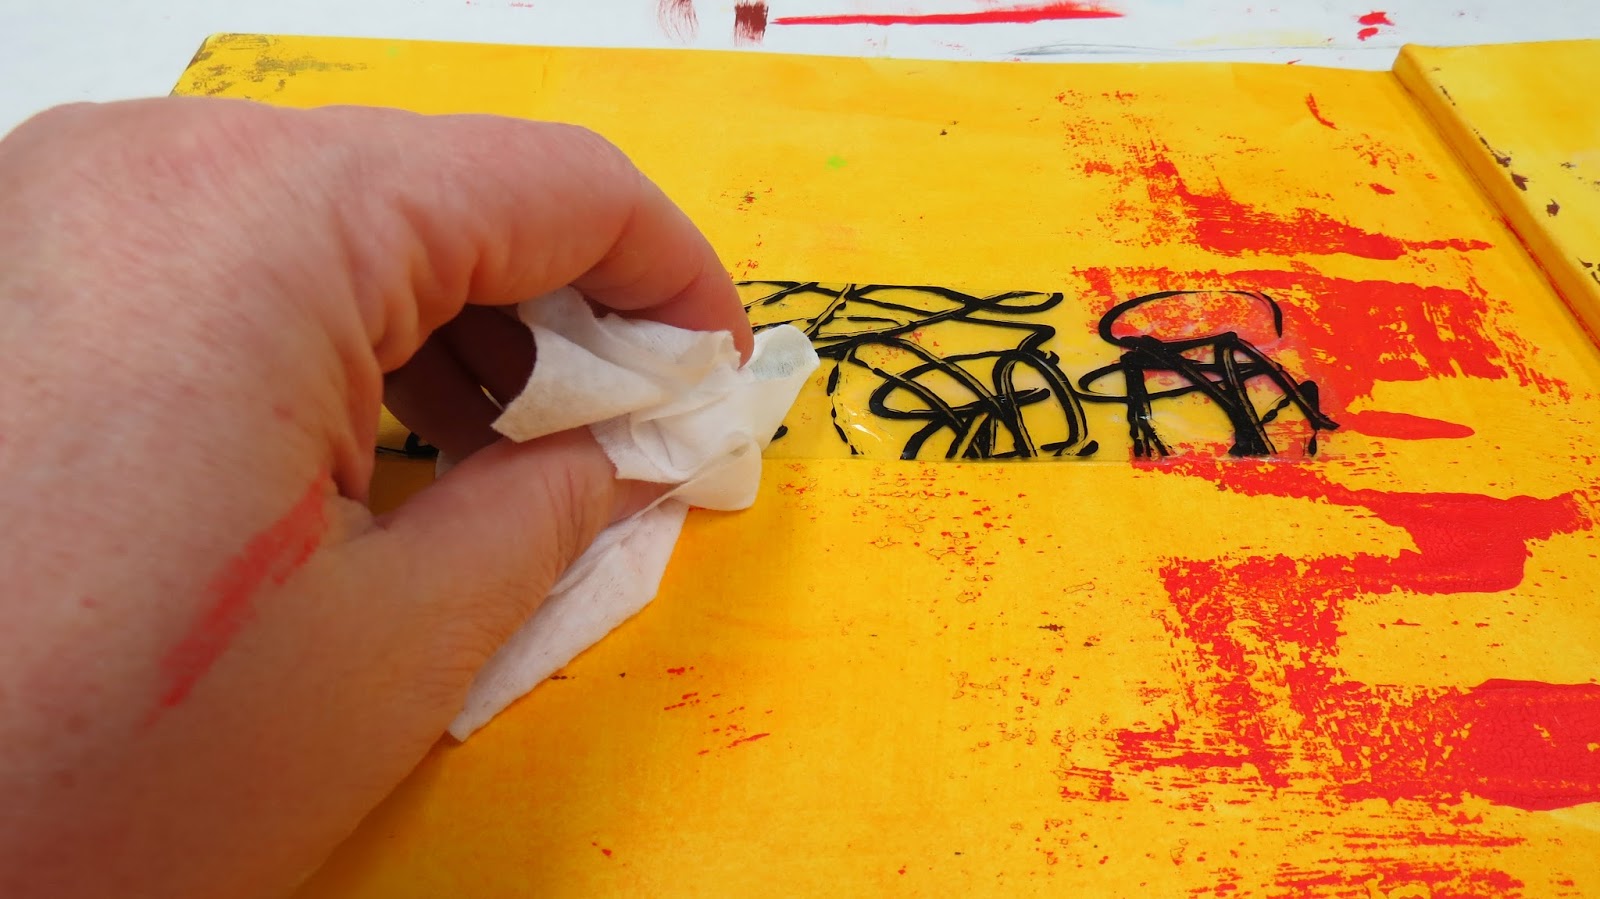
... and allow it to dry. You may notice that the glue or medium you've used under the skin looks cloudy, but if you've used a transparent medium it will clarify as it dries and cures.
Tips and Suggestions
~ You don't have to make scribbles or letters, you can create geometric shapes, leaf shapes, trees, etc. Let your imagination flow!
~ You don't have to use a squeezie bottle. Try a paint brush or texture tools, instead!
~ You don't have to use just one color per skin. Imagine a rainbow of colors, mix and match to your hearts' content.
~ If you don't like something you've sketched onto your pocket protector, take a damp baby wipe and clean it away.
I hope you enjoyed this tutorial; I'll see you next week, when I hope to have a new painting to show you. In the meantime, create. Just create!
11 comments:
Amazing.
Great tutorial - I had not seen this method before. Thanks for sharing.
Thanks for sharing...This gives me some ideas I will try! I do skins in my MIXED MEDIA work!
Thanks for this. I do a lot of free motion quilting and I could see my quilting patterns working well with this.Not sure what I would do next, as I usually only work in fabric, but it has got my creative juices working.
Hilary Florence
Makes me want to make some just to make some! Can't see where that would fit into my textile work, but it's really, really cool. Thanks for sharing.
Thanks for sharing a great technique. I have just tried it, using Scotch Quick Dry adhesive, which has a small nozzle on the bottle, to create my design, and I then sprinkled tea from some dried used teabags over it and shook off the excess. I am going to incorporate the film into some teabag art I am working on - using the used teabags which are beautifully and subtly coloured, it seemed a shame to waste the tea!
I used some acrylic polymer I had - it took ages to dry, but the results are great, and the tealeaves are completely trapped in the medium and look great.
Shoshi
Great tutorial! But don't give me too much credit for the acrylic skin idea - that comes from Patti Brady (I think I put a link to her on my post). Fun, eh? You make it look so easy!
I tried it, but the skin won't come off the plastic background. Do you put something in between so they don't stick? - Edythe
Note to self: Do not drink while reading Judi's blog. I was taking a sip of water as I began to read this post, and when I read, "Go watch it, I'll wait," I laughed so hard the water came spewing out my nose... thankfully I turned my head and didn't spray my laptop. So thank you for THAT, and for such an informative fun blog.
I have been experimenting with acrylic skins. I gathered all of my mediums and glues to test ones that would dry clear. The ones that work: Liquitex Clear Gel, Golden Self-Leveling Gel, Sobo Glue and Mod Podge Gloss.
The jar I had of Mod Podge Gloss was old and I think I must have added water to it at some point because it was more liquid. However, I decided to use the Mod Podge first and it came out transparent. I poured it onto a piece of plastic shower curtain. I wish I could add a photo because I think it's really neat. Also, I didn't put paint in a squeeze bottle. I dabbed paint on with a small brush.
Thank you Judi for this tutorial.
Great post Judi. I have been wanting to try making acrylic skins for some time. Your tutorial is fantastic with step by step instructions which will make the process easier. I will post my results in my new blog as soon as I succeed. Thank you for making this tutorial.
Post a Comment