Next week I'll finally be posting about stamps and texture tools. I know I haven't done a how-to lately, but hopefully this will serve as one. I'll be discussing tools...
... how to make them...
... how to modify them...
... how to take care of them...
... and of course, how to use them...
In the meantime, happy creating!
Friday, May 28, 2010
Tuesday, May 25, 2010
Following In Her Footsteps
Energized and inspired by last week's interview with Sherrill Kahn and the peek we were given at her new work, Monday morning found me setting up the wet studio for some marathon fabric painting. I used to spend days and days doing this- mostly on paper and wood- and I have missed it a lot, lately.
While this may look like a total mess, it's actually lightning in a bottle. Arranged on the table within reach are many different kinds of paints- Lumiere, Neopaque, Jacquard Textile paints, Dye-Na-Flow and even some of my dwindling supply of Sherrill's Sorbets- a bunch of hand-made stamps, sponges, brushes, paint palettes, water and all kinds of painting grounds from white fabric to pre-painted papers. Plus, of course, coffee- lots of coffee.
Using techniques demo'd in Sherrill's video, I reacquainted myself with the joys of painting with abandon. All of the pieces I painted ranged in size from about 28"x18" to 8"x11". No ground safe, no technique untried, nothing was "finished" until it screamed at me to stop. Here's what I've created so far.
(cotton fabric)
(artists' canvas... this one is my favorite)
(cotton fabric)
(cotton fabric, taken from the piece above and slathered with Lumiere)
(cotton fabric)
(watercolor paper)
(heavy interfacing)
(copy paper)
(watercolor paper)
No idea what these beauties will be used for, and there are more in progress on the table, waiting for another painting session tomorrow.
Happy creating!
Wednesday, May 19, 2010
Sherrill Kahn- Questions, Answers, And A Review
I am a self-trained artist. I cannot, however, claim to be a self-taught artist because while it's true that I've had no formal art training of any kind, I have nonetheless filled my creative life with the books, articles, and DVD tutorials of some amazing artists who have taught me, sight unseen, what it means to create.
One of my very first and favorite teachers, and a continuing source of inspiration, is mixed-media artist, Sherrill Kahn. Sherrill and I have never met, I've never been fortunate enough to take a workshop with her, but by studying her books and her thoroughly engrossing artwork, I learned about color, design, movement, contrast, and most importantly, the creative liberation of playful experimentation. My discovery some years ago of Sherrill's books and her body of work has, in many measurable ways, changed my creative life.
So when I saw recently that Creative Catalyst was offering a DVD workshop taught by Sherrill called Acrylic Paint Pizzazz: Collage Techniques for Paper & Fabric, I think I was probably the first in line to purchase it. While my obsession with creating "art fabric" has taken me over quite a lot lately, leaving me less time for the art of mixed-media painting, I just couldn't pass up the opportunity to watch Sherrill speak about and demonstrate her astonishing techniques for achieving rich depth and texture.
The DVD met and exceeded my hopes. With 25 chapters of fascinating material to peruse, I wound up spending quite a few hours watching and rewatching as Sherrill worked her way through a dizzying array of products, materials and mediums while clearly and defty explaining it all.
In this video workshop, Sherrill explores acrylic painting techniques that are appropriate for both mixed-media beginners and experts, from sponging, to stamping and creating your own temporary stamping pad, to creating resists with both paint and masks, to using paint in fine-tipped squeeze bottles to generate drama and add fine detail. While Sherrill demonstrates these techniques mostly on fabric and paper, they can be used on nearly any surface including fabric, wood, metal and even lightly-sanded plastic.
She uses acrylic fabric paints, Neopaque, Dye-Na-Flow, Lumiere, as well as a small army of useful tools, the vast majority of which can be purchased in your local hardware store. If you're afraid of traditional painting, this DVD will speak directly to you- there isn't a paint brush in sight; Sherrill creates her art with sponges, stamps, and her own fingers.
At the conclusion of the DVD, Sherrill shares her suggestions for creating both paper and fabric collages with the reams of papers and fabrics you will create using her easy and incredibly effective techniques.
Sherrill has been kind enough to answer a few of my questions and to offer all of us a glimpse of her new work, some of which she calls, "experimental".
"There really isn't a typical day. I usually first answer emails, and once that is done, I start working on whatever project I have going. I am always trying new things, so whatever is current is what I concentrate on for that day."
Can you tell us a little about your work/studio space? Do you create in a dedicated studio or is the kitchen table sufficient?
"I have a third bedroom that I use for a studio. It is about 120 square feet. I have maximized it with built-ins and work areas. I have a computer corner, and a main work area that is raised to 39" so that I can stand and work. The raised area is about 45 square feet.
"I have a painting area by the window with about a 30" x 30" area open so that I can paint. It is a large desk and there ARE paint and art supplies on three sides with the front open for me to draw and paint.
"Finally, I have a sewing area surrounded by trays filled with thread.
"The studio is tiny, but I have maximized every square inch for working areas. I also have hundreds of books in the studio. Plus I have wonderful artwork that my friends have made, or pieces I have done that are sculptural. It is a very warm environment for creating."
I know for myself when I complete a piece of art, I love it for a while and then I detach from it and move on to the next piece. How do you feel about your work once you've completed it?
"I usually become very attached to my work. I am just now realizing that I can let some of the work go. I have come to this conclusion very reluctantly. I have some pieces that I will never sell because they hang on my walls and I am very attached to them. I just started selling work from my website about a month ago. I hated to see the pieces go, but I am thrilled that they will be enjoyed by the people that bought them."
Has the advent of computers and creative software packages influenced your work? If so, in what way?
"I love using the computer creatively. I am constantly pushing the envelope by altering my photos and artwork on the computer. I often completely alter the printed images with different art media or use them for collage in my work. I can lose a whole afternoon playing on the computer. With the new programs out there, it takes only a few steps to completely change your work."
In your video, Acrylic Paint Pizzazz: Collage Techniques for Paper and Fabric, you work with paints, fabric and paper at a dizzying, improvisational pace but I know you also incorporate stitch and fibers into your work, as well. Do you take the same experimental approach at the sewing machine?
"Yes, I am very experimental when I use the sewing machine. I used to make most of my clothing, but now I very rarely sew clothing at all. I use the sewing machine to enhance the surface of my artwork. I love combining papers and fabric together in one piece and am doing some very experimental work right now that has't been seen yet. I am still in the early stages right now using the sewing machine in a new way with my work."
Has there ever been an event, or an artistic realization, that radically changed your work and if so, would you be willing to share it with us?
"I think that my work changed when I retired from teaching public school. I was able to use my drawing and painting skills in ways that I hadn't used them before.
Starting a rubber stamp company also led to a new style in my work. I started teaching more and using the stamps more and more in my work. I was doing a lot of photorealism in my work before the stamps. I haven't done photo realism in years. I am drawing an entirely new rubber stamp line right now. I sold out the rubber stamp part of my business and people were so upset, that I decided to do something new. I am drawing every day and hope to launch the new rubber stamps this summer."
You teach a lot of classes around the country. Do you ever take any? What was your favorite?
"I do take classes occasionally. I took a wonderful class with Jan Beaney and Jean Littlejohn a few years ago. I learned about needle felting with a single needle and also how to use the sewing machine as a painting tool. I am fascinated by so many techniques and want to literally try anything and everything. I will be taking a class at the end of the month on using Lutradur. I like to take classes using media that is new to me. I am very picky about the classes I choose, however, because I am very busy."
Thank you for sharing so generously of your time and work, Sherrill!
(All images are copyrighted and are the sole property of Sherrill Kahn. They are reproduced here with her kind permission.)
Tuesday, May 11, 2010
Tuesday Afternoon
The week has only just begun, but as usual, I find myself busy in many different areas of the studio.
This week, the green FPR piece I began last week...
... got crackled and layered with green Neopaque thinned with water.
While it's a very interesting piece of fabric, it will be ineligible for any juried competition due to some rather glaring technical errors. The fabric is cotton sateen, with a very definite sheen on one side and a matte appearance on the other. I put the FPR on the wrong (matte) side. In addition, the FPR was thinner in some areas than I realized and too much paint soaked into the fabric in large, unattractive blotches that have a stiffer hand than the rest of the fabric.
It will be a beautiful fabric for stitching, though, and has large areas of lovely, fine crazing I can use.
It will become the sashing for a developing piece of art that began with last week's "stash-busting" quilted piece...
The above piece was combined with the green crackle fabric and more of my hand-dyed fabrics and batting, to become this...
... which will go under the needle this week and next. The entire piece will measure about 45" x 53 when completed.
Elsewhere in the studio, these two large pieces of cotton, both previously hand dyed, have entered into a partnership with some violet Dye-Na-Flow.
They will be allowed to dry just like this, which will probably take days- each piece of fabric was very wet even before the paint was poured onto them. No idea what I have here until I unfold them and iron them out. Maybe more on these, next week.
In the meantime, happy creating!
Saturday, May 8, 2010
No, THIS One!
The flour paste resist fun rolls on!
As you know, I started with this piece of cotton sateen that had been LWI dyed, parfait-style, with eight other lengths of the same sateen. Not particularly thrilled with the result, I overdyed it once more in lemon yellow and then covered it with a flour paste resist. (If you've never heard of a FPR before, or aren't sure how to use one, scroll to the bottom of this post for a brief explanation.)
An odd thing happened with this FPR, though. I have previously used both Golden Fluid acrylics and thinned Neopaque to achieve my crackle finishes but this time I wanted to use thickened fiber reactive dye, so after completing the last wash out of the yellow overdye, I soaked the fabric in soda ash and allowed it to drip dry before applying the flour paste. But as the FPR soaked into the fabric, yellow dye began to leech out. Bleck.
Either I hadn't rinsed and then washed the fabric well enough after the second dye bath and as a result, I hadn't gotten out all of the excess dye particles, or for some odd reason, the flour paste reacted with the soda ash present in the fibers. I'm guessing the problem was the former rather than the latter, though. I'm usually very particular about making sure my dyes are totally rinsed out, but I dropped the ball this time.
Fortunately, it didn't seem to effect my final results.
After the FPR had dried (which took two days, not the one I had predicted), I crumpled it carefully. I mixed fresh black dye, Urea and more soda ash solution into SuperClear, a pre-mixed thickening agent sold by Dharma Trading which is used to thicken dyes for direct (painting) application. While I had found the SuperClear to be too thin for monoprinting, it was ideal for this application, which needed to be more soupy than thick. It got slathered on in a careful and slow process that I've begun to find very relaxing in a Zen-like way.
I covered it and let it batch for four hours.
I washed out the FPR in a large bucket of cold water and after that it was treated to the same series of rinses and machine washings as all my other hand-dyeds.
There will likely be one more huge FPR in my immediate future because there's something else I want to try with it before I turn all my focus to stitching my newest Fringe piece.
This crackle piece...
... is still curing and has not been washed out, yet. That will happen on Tuesday and then I'll be able to see how that piece turned out, as well. I'll post photos when I have them.
Lots more monoprinting done this week with dyes, too... they're in the washing machine right now and if any of those are interesting, I'll post about them, too, next week.
Also, this little piece is under the needle this week... can't imagine why I thought it would help me knock down my stash of scraps- it didn't even make a dent!
All these fabrics, including the backing fabric and batting, were hand-dyed, painted and batik'd by me.
It's about 24" x 18" or so, though I haven't measured it, yet. I'll post more about it when it's finished being stitched. In the meantime, happy creating!
***To briefly recap, a FPR is plain white baking flour, mixed slowly with cold water to form a paste of pancake batter consistency. Fabric is pinned to a secure surface (I prefer something slightly absorbent, like an old sheet, but you could do it on plastic sheeting, as well.) The FPR is poured slowly onto the fabric and moved around, either with your hands or with a plastic trowel, until it covers the fabric. It is allowed to dry completely (you really want it bone dry for this), gently crumpled in the hands to create cracking and crazing in the hardened paste, and finally, painted over with your favorite pigment like thinned acrylic paint, textile paint, dye-na-flow or fabric dye (note: if you use dye, I recommend pre-soaking your fabric in soda ash and adding soda ash solution to your chemical water.)
The paste behaves as a resist, blocking most of the pigment from reaching the fabric, but allowing some of it to seep through the cracks, leaving a startling crackle finish.
As you know, I started with this piece of cotton sateen that had been LWI dyed, parfait-style, with eight other lengths of the same sateen. Not particularly thrilled with the result, I overdyed it once more in lemon yellow and then covered it with a flour paste resist. (If you've never heard of a FPR before, or aren't sure how to use one, scroll to the bottom of this post for a brief explanation.)
An odd thing happened with this FPR, though. I have previously used both Golden Fluid acrylics and thinned Neopaque to achieve my crackle finishes but this time I wanted to use thickened fiber reactive dye, so after completing the last wash out of the yellow overdye, I soaked the fabric in soda ash and allowed it to drip dry before applying the flour paste. But as the FPR soaked into the fabric, yellow dye began to leech out. Bleck.
Either I hadn't rinsed and then washed the fabric well enough after the second dye bath and as a result, I hadn't gotten out all of the excess dye particles, or for some odd reason, the flour paste reacted with the soda ash present in the fibers. I'm guessing the problem was the former rather than the latter, though. I'm usually very particular about making sure my dyes are totally rinsed out, but I dropped the ball this time.
Fortunately, it didn't seem to effect my final results.
After the FPR had dried (which took two days, not the one I had predicted), I crumpled it carefully. I mixed fresh black dye, Urea and more soda ash solution into SuperClear, a pre-mixed thickening agent sold by Dharma Trading which is used to thicken dyes for direct (painting) application. While I had found the SuperClear to be too thin for monoprinting, it was ideal for this application, which needed to be more soupy than thick. It got slathered on in a careful and slow process that I've begun to find very relaxing in a Zen-like way.
I covered it and let it batch for four hours.
I washed out the FPR in a large bucket of cold water and after that it was treated to the same series of rinses and machine washings as all my other hand-dyeds.
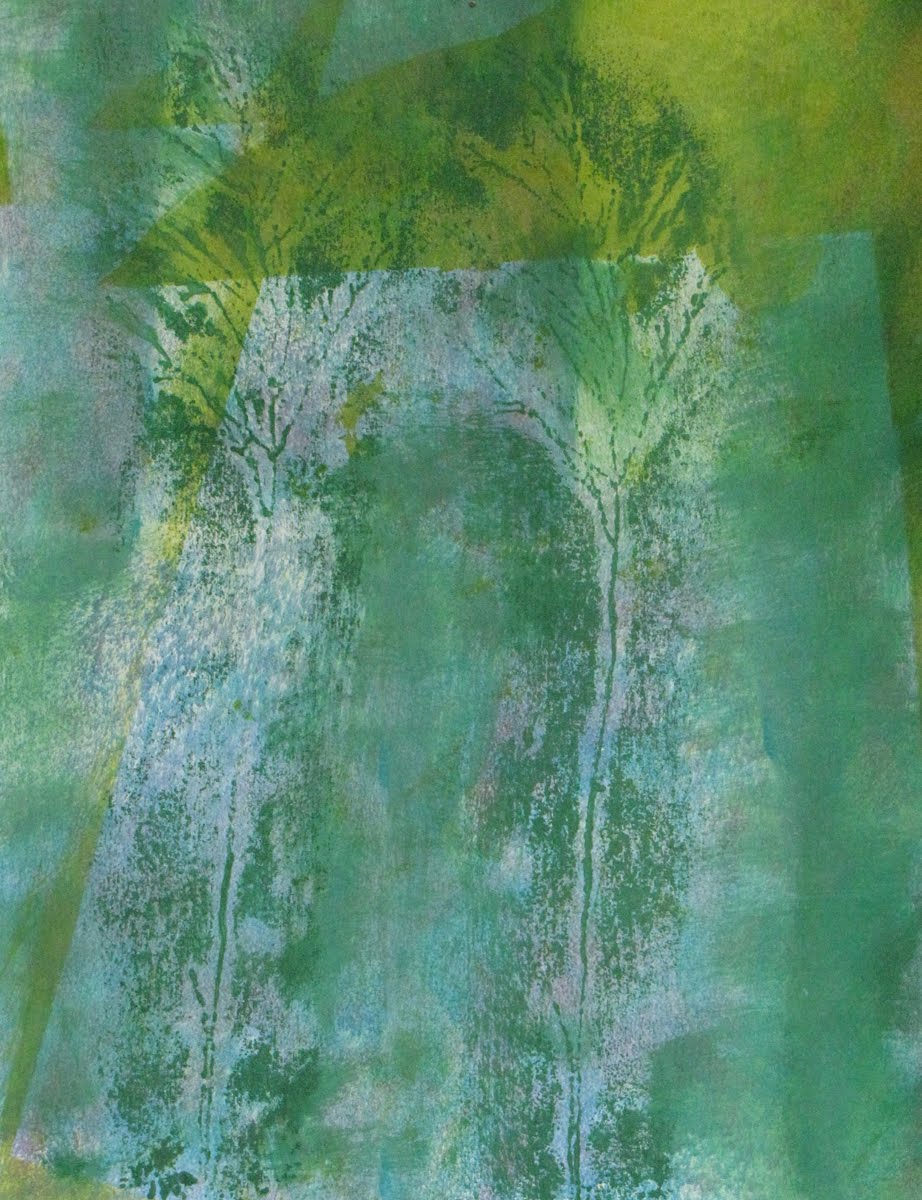
(entire piece, 90" x 45")
(closer)
(detail)
Pretty spectacular. If I had my druthers, it wouldn't have quite as much crackling as it does, I guess I got a little carried away with crumpling the fabric, but still a very striking piece that I hope will help jury me into Blurred Boundaries. There will likely be one more huge FPR in my immediate future because there's something else I want to try with it before I turn all my focus to stitching my newest Fringe piece.
This crackle piece...
... is still curing and has not been washed out, yet. That will happen on Tuesday and then I'll be able to see how that piece turned out, as well. I'll post photos when I have them.
Lots more monoprinting done this week with dyes, too... they're in the washing machine right now and if any of those are interesting, I'll post about them, too, next week.
Also, this little piece is under the needle this week... can't imagine why I thought it would help me knock down my stash of scraps- it didn't even make a dent!
All these fabrics, including the backing fabric and batting, were hand-dyed, painted and batik'd by me.
(detail)
It's about 24" x 18" or so, though I haven't measured it, yet. I'll post more about it when it's finished being stitched. In the meantime, happy creating!
***To briefly recap, a FPR is plain white baking flour, mixed slowly with cold water to form a paste of pancake batter consistency. Fabric is pinned to a secure surface (I prefer something slightly absorbent, like an old sheet, but you could do it on plastic sheeting, as well.) The FPR is poured slowly onto the fabric and moved around, either with your hands or with a plastic trowel, until it covers the fabric. It is allowed to dry completely (you really want it bone dry for this), gently crumpled in the hands to create cracking and crazing in the hardened paste, and finally, painted over with your favorite pigment like thinned acrylic paint, textile paint, dye-na-flow or fabric dye (note: if you use dye, I recommend pre-soaking your fabric in soda ash and adding soda ash solution to your chemical water.)
The paste behaves as a resist, blocking most of the pigment from reaching the fabric, but allowing some of it to seep through the cracks, leaving a startling crackle finish.
Wednesday, May 5, 2010
Dyebaths and Resists and Thread Schmutz, Oh My!
Are you sick of flour paste resists, yet? No, me either.
This piece, which never really did a whole lot for me...
... got a bath this week to tone down its high contrast, a bit.
Now that I'm liking it better...
...it got covered with flour paste today.
This is the largest FPR I've done so far, cotton sateen measuring 90" by 45" (selvage to selvage), and it's taking up my entire work table in the wet studio. However, the weather here right now is unseasonably dry and I expect it to be cured by tomorrow morning and ready for its next layer.
Monday's FPR was dry by yesterday morning, so it got its next layer, too- medium green textile paint.
Because this was treated with textile paint, it will need to cure for about a week before it's safe to wash out the flour. It looks promising, though a bit busy. It might need a final, unifying overdye of a solid color.
Also out the dye baths this week were some mostly unremarkable scraps as well as some lovely, nubbly cheesecloth.
On March 6th of this year, I started stuffing excess thread schmutz into one of my hanging squirrel feeders.
It looked so pretty and was such a great solution for offering nesting fiber to the birds while keeping it mostly contained. Over time, it has begun to resemble a "disintegration bundle", which I've found fascinating. (A disintegration bundle is a package of paper, fabric, metal and fibers that some artists hang from fences and trees in order to study the effect the elements have on the materials.)
I can tell that the birds are using these fibers because I find them tugged out and hanging loose, and they are also strewn around the yard, like bright little baubles in the grass. My hope is to one day spot some of this material in a birds' nest so I can photograph it.
And finally, one from the feeders.
Happy creating!
Tuesday, May 4, 2010
Happy 25th To Us!
Thank you, sweetie. I love you, too.
Wish we could be hanging out here together, tonight...
For all the amazing years...
For all the years to come...
Happy Anniversary!
Subscribe to:
Posts (Atom)